Nasal Cavity thru Nasopharynx
During this period, we are first going to examine the cervical vertebral column, from which the head and cervical viscera were separated during the last period. Following study of the posterior aspect of the pharyngeal wall and associated neurovascular structures, we will make a midline incision in the posterior pharyngeal wall and gain an overview of the pharynx. Then we will bisect the base of the skull and the nasal cavity and palate to expose the internal features of the nasal cavity and nasopharynx.
The atlas, or first cervical vertebra, articulates above with the occipital bone of the skull and below with the axis, or second cervical vertebra. The atlas consists of a ring of bone enclosing a large vertebral foramen (Fig. 1; Gr 4.10, 4.11; N19). It is formed by anterior and posterior arches and paired lateral masses. The curved anterior arch of the atlas has a small midline anterior tubercle in front for muscle and ligament attachments. On the posterior surface of the anterior arch is a facet for articulation with the dens of the axis at the synovial median atlantoaxial joint. The posterior arch of the atlas has a posterior tubercle in the posterior midline and a groove for the vertebral artery superiorly on each side.
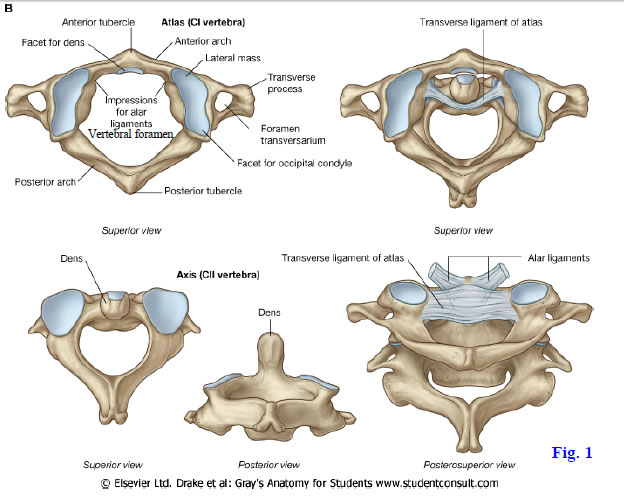
Each large lateral mass of the atlas features a superior articular facet, which is concave for reception of the rounded occipital condyle. Medially the lateral mass has a small tubercle for attachment of the transverse ligament of the atlas (Fig. 1 upper right; Gr 4.11A, 4.38C; N19, 23). The transverse process extends laterally from the lateral mass, making the atlas the widest of the cervical vertebrae. Like the other cervical vertebrae, the atlas’ transverse process encloses a transverse foramen traversed by the vertebral artery.
The axis is similar to other cervical vertebrae, except for the vertical process of bone (dens or odontoid process) arising from the upper surface of its body (Fig. 1; Gr 4.9, 4.10, 4.11, 4.38C-D; N19, 21). The axis has superior articular facets for articulation with the lateral masses of the atlas and inferior articular facets for articulation with the third cervical vertebra. Each transverse process contains a transverse foramen. The spinous process of the axis is usually bifid.
The atlanto-occipital joints are formed between the condyles of the occipital bone and the superior articular facets of the atlas (N10, 15, 22). They are responsible for approximately 50% of the flexion and extension in the cervical region, as in nodding the head “yes.” These joints also permit limited lateral bending.
The three atlantoaxial joints comprise a single median atlantoaxial joint and paired lateral atlantoaxial joints. The median atlantoaxial joint is a pivot joint formed by the articulation of the dens with the anterior arch of the atlas in front and with the transverse ligament of the atlas behind (Fig. 1, upper right; Gr 4.11C-D, 4.38C-D, 4.52B, 8.2; N19, 21, 23). The paired lateral atlantoaxial joints are formed between the lateral masses of the atlas and superior articular facets of the axis. They are the gliding type of synovial joints. The atlantoaxial joints are involved mainly in rotation with the atlas, carrying the head, rotating around the dens of the axis, as in shaking the head “no.”
Both the dens and the cervical spinal cord are located inside the vertebral foramen of the atlas (Gr 4.1B, 4.52F, 8.41, 8.42A; N63, 105). This relationship has potentially fatal consequences if a partial dislocation (atlantoaxial subluxation) or complete dislocation (atlantoaxial luxation) occurs between the atlas and axis. Essential restraint of movement is provided by ligaments. The transverse ligament of the atlas prevents posterior displacement of the dens, protecting the spinal cord. If the transverse ligament is weakened by conditions such as rheumatoid arthritis or in a patient with Down syndrome, it may rupture to allow a spinal cord injury. Likewise, a fracture of the base of the dens may allow substantial movement between the atlas and axis since the dens is held against the anterior arch of the atlas by the transverse ligament of the atlas.
Vertical bands of connective tissue extend superiorly to the occipital bone and inferiorly to the body of the axis from the transverse ligament of the atlas (Gr 4.38D, 4.39B-C; N23). Together the transverse ligament and these vertical bands are referred to as the cruciform (cruciate) ligament. The cruciform ligament is covered posteriorly by the superior extension of the posterior longitudinal ligament, the tectorial membrane.
A stout alar ligament extends on either side from the dens to the medial surface of the occipital condyle (Fig. 1; Gr 4.39B-C; N23). These ligaments are located anterior to the cruciform ligament. The alar ligaments serve as check ligaments, preventing excessive rotation of the head and atlas at the atlantoaxial joints. Unilateral rupture of an alar ligament allows a substantial increase in rotation of the head toward the contralateral side. A slender apical ligament of the dens extends from the apex of the dens to the anterior margin of the foramen magnum (N23, 63) but is of limited importance.
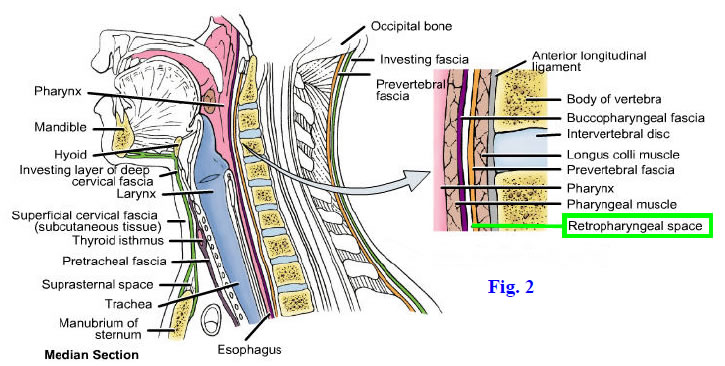
The muscles on the anterior surface of the cervical vertebral column are covered by prevertebral fascia (N34). This fascia is clinically important because it helps channel the spread of infections. A subdivision of this prevertebral fascia into anterior (alar) and posterior layers has been described, although the two layers are not apparent during routine dissections. The potential space between these two layers (sometimes called the “danger space”) provides a pathway for the spread of infection from the base of the skull all the way to the diaphragm.
A more widely recognized potential space, the retropharyngeal space, exists between prevertebral fascia and the buccopharyngeal fascia on the posterior wall of the pharynx (Fig. 2; Gr 8.1, 8.18, 8.39A, 8.41A; N34, 63, 65). This is the fascial plane where the cervical visceral was separated from the vertebral column when the viscera was reflected forward with the head during the previous dissection. The retropharyngeal space extends from the base of the skull to the level of the third or fourth thoracic vertebra. It permits normal movements of the pharynx and esophagus during swallowing. Unfortunately, it also provides a pathway for the spread of infection into the superior mediastinum to produce an often fatal mediastinitis (e.g., see http://erj.ersjournals.com/content/7/9/1716.full.pdf ).
The prevertebral fascia covers paired prevertebral muscles, three of which attach to the occipital bone and were cut when the head was reflected from the vertebral column. The rectus capitis anterior and rectus capitis lateralis pass between the atlas and occipital bone on each side (Gr 8.24, Table 8.6 [p. 760]; N29). The longus capitis extends superiorly from the anterior tubercles of vertebrae Cv3-6 to attach to the basilar part of the occipital bone. The two rectus muscles and the longus capitis mainly flex the head.
The longus capitis partially hides the more medial longus colli muscle (Gr 8.24; N29). The longus colli passes longitudinally from the body of vertebra Tv3 upward to the anterior tubercle of the atlas. It also has oblique fibers that attach to the transverse processes of vertebrae Cv3-6. The longus colli acts bilaterally to flex the neck and contracts unilaterally to help rotate it toward the opposite side. These prevertebral muscles are segmentally innervated by the anterior rami of cervical spinal nerves.
1. Having a skeleton for reference facilitates study of the atlanto-occipital and atlantoaxial joints. Turn your attention to the cervical vertebral column and prevertebral region on the cadaver. The atlanto-occipital joints were disarticulated when the head and cervical visceral were reflected forward. Study the articulations of the atlas and transverse ligament of the atlas with the dens of the axis at the median atlantoaxial joint. Attempt to rotate the atlas on the axis and note that the lateral atlantoaxial joints also participate in rotation of the atlas and head.
2. Identify the prevertebral fascia and clean it from the underlying muscles. Superiorly the prevertebral fascia covers the longus capitis muscles, which were torn during separation of the head from the atlas. The rectus capitis anterior and rectus capitis lateralis also were torn. Find the longus colli muscles medial to, and partially hidden by, the longus capitis muscles. Follow the longus colli muscles superiorly to their attachment on the anterior tubercle of the atlas. Palpate the prominent anterior tubercle of vertebra Cv6, the carotid tubercle, where the common carotid artery can be compressed to help control bleeding from the carotid arterial system. XXX
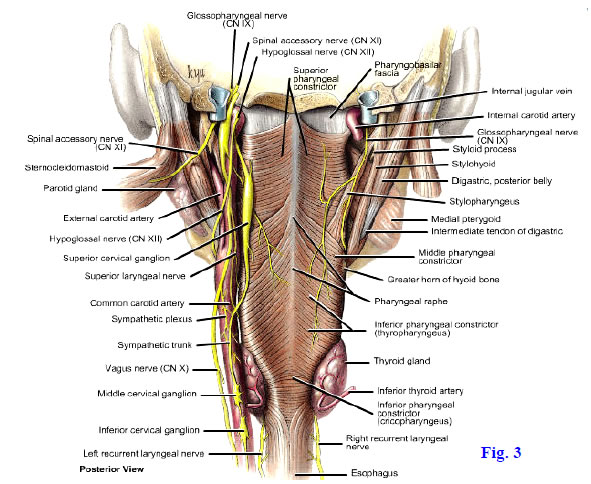
The pharynx is a musculofibrous tube suspended from the base of the skull and located posterior to the nasal cavities, oral cavity, and larynx. The pharynx is a common chamber of the respiratory and digestive systems and opens inferiorly into the larynx and esophagus. Its wall contains an external circular layer of muscle—the superior, middle, and inferior pharyngeal constrictor muscles—and an internal longitudinal layer—the stylopharyngeus, salpingopharyngeus, and palatopharyngeus muscles (Gr 8.28, 8.29B, 8.32C,Table 8.7 [pp. 766-767]; N63, 65, 67, 68). The stylopharyngeus arises from the styloid process of the temporal bone lateral to the pharyngeal wall and enters it between the superior and middle constrictors (Figs. 3, 4; N67, 68). The pharynx will be studied in detail later in this period and during the next period.
Lateral to the pharynx are major blood vessels and nerves of the head and neck (Gr 8.9, 8.21, 8.28A-B, 8.39; N69, 70). These include the contents of the carotid sheath on each side—the common and internal carotid arteries, internal jugular vein, and vagus nerve. The common carotid artery ascends to near the level of the superior border of the thyroid cartilage to divide into the internal and external carotid arteries. The internal carotid artery continues superiorly from the carotid bifurcation to the carotid canal in the petrous portion of the temporal bone. The internal carotid artery normally has no branches in the neck.
A dilatation of the proximal 2 cm of the internal carotid artery is the carotid sinus, which is a baroreceptor stimulated by changes in blood pressure (Gr Table 9.11 [p. 816]; N124, 129). A small brownish mass of tissue resembling fat deep to the bifurcation of the common carotid artery is the carotid body. The carotid body is a chemoreceptor for blood gases. Both the carotid sinus and carotid body receive afferent (GVA) innervation from the carotid sinus branch of the glossopharyngeal nerve (CN IX) and may also receive innervation from the vagus nerve (CN X).
The external carotid artery and its branches were studied with the anterior triangle of the neck. One branch that may have been difficult to see in previous dissections is the small ascending pharyngeal artery, which is often the first or second branch of the external carotid and arises from its deep (medial) surface (Gr 8.28B; N33, 69). The small ascending pharyngeal artery gives branches to the pharynx and soft palate, middle ear, and meninges.
The internal jugular vein descends from the jugular foramen lateral to the carotid artery to join the subclavian vein behind the sternoclavicular joint, forming the brachiocephalic vein (Gr 8.5, 8.16E-F; N30, 70, 206). The internal jugular vein has a dilatation, the inferior bulb, at its termination. The inferior bulb contains a bicuspid valve that prevents a reflux of blood during increases in intrathoracic pressure. Most of the tributaries the internal jugular receives correspond to branches of the external carotid artery.
The deep cervical lymph nodes form a chain along the internal jugular vein and receive all of the lymphatic drainage from the head and neck (Gr 7.88A-B, 8.5A, 8.17D; N72, 73). Efferents from the deep cervical nodes form the jugular lymphatic trunks. The deep cervical nodes may adhere to the internal jugular vein in cancer and are removed with it in a radical neck dissection.
The vagus nerve (X) descends through the jugular foramen with the glossopharyngeal and accessory nerves (Fig. 3; Gr 8.28; N71, 103, 125). It continues inferiorly within the carotid sheath behind and between the carotid artery and internal jugular vein. Branches of the vagus nerve in the neck include the pharyngeal, superior laryngeal, cervical cardiac, and recurrent laryngeal nerves (Fig. 3; Gr Table 9.12 [pp. 818-819]; N125, 129, 130). The pharyngeal branch arises just below the inferior (nodose) ganglion of the vagus. It passes medially anterior to the sympathetic trunk to reach the posterior wall of the pharynx and help form the pharyngeal plexus over the middle pharyngeal constrictor. The pharyngeal branch supplies SVE motor nerve fibers to all of the muscles of the pharynx, except the stylopharyngeus (IX), and to all the muscles of the soft palate except tensor veli palatini (V3). (Note: these SVE fibers originate in the cranial root of XI.)
The superior laryngeal branch of the vagus nerve typically arises just below the pharyngeal branch, but occasionally from a common stem with it (N71, 125, 129). The superior laryngeal nerve descends anteriorly and divides into internal and external laryngeal nerves. The internal laryngeal nerve pierces the thyrohyoid membrane with the superior laryngeal artery, where it was seen during the anterior triangle dissection. It is sensory to the mucosa of the piriform recesses (laryngopharynx), upper half of the larynx, epiglottis, and a small area at the root of the tongue. The external laryngeal nerve descends with the superior thyroid artery deep to the sternothyroid muscle (Gr 8.9II, 8.16III-IV, Table 8.7 [pp. 766-767]; N74) to innervate the cricothyroid muscle.
Superior and inferior cervical cardiac branches of the vagus descend medially through the superior thoracic aperture (N125). They carry preganglionic parasympathetic and general visceral afferent nerve fibers involved in cardiac function. Parasympathetic fibers decrease the rate and force of the heart’s contractions.
The recurrent laryngeal nerve ascends in the groove between the trachea and esophagus and has a close relationship to the inferior thyroid artery (Fig. 3; Gr 8.21, 8.28, 8.29B, 8.35; N32, 74, 75). The left recurrent laryngeal nerve arises within the thorax as the left vagus nerve descends across the arch of the aorta. It curves backward under the arch of the aorta and ascends into the neck between the trachea and esophagus. The left recurrent laryngeal nerve’s course makes it vulnerable to thoracic as well as cervical pathologies (e.g., bronchogenic carcinoma that has metastasized to the tracheobronchial lymph nodes). Therefore, it is more commonly involved in lesions than the right recurrent laryngeal nerve.
The right recurrent laryngeal nerve branches from the right vagus nerve as it passes anterior to the right subclavian artery (Gr 8.20, Table 9.12 [pp. 818-819]; N32, 74, 75). After looping under the subclavian artery, it passes superiorly in the tracheoesophageal groove. The two recurrent laryngeal nerves supply all of the intrinsic muscles of the larynx except the cricothyroid muscles and are sensory to the mucous membrane of the lower portion of the laryngopharynx and of the larynx inferior to the vocal folds. The terminal portions of the recurrent laryngeal nerves, once they ascend deep to the inferior pharyngeal constrictor muscles, are termed the “inferior laryngeal nerves” (N80).
The glossopharyngeal nerve (CN IX) emerges from the jugular foramen and gives off the small tympanic branch of IX just below the jugular foramen (Gr 7.82A, 7.83B, Table 9.11 [p. 817]; N124, 133). The tympanic nerve ascends through the tympanic canaliculus (N12) to enter the tympanic (middle ear) cavity. It joins caroticotympanic branches of the sympathetic internal carotid plexus to form the tympanic plexus on the promontory. In addition to supplying the mucous membrane of the middle ear, the tympanic plexus gives rise to the lesser petrosal nerve, which enters the middle cranial fossa en route to the otic ganglion.
The glossopharyngeal nerve descends first posterior and then lateral to the stylopharyngeus muscle to enter the pharyngeal wall between the superior and middle pharyngeal constrictor muscles (Gr 8.28, Table 8.7 [pp. 766-767]; N69, 71, 129). It supplies motor (SVE) innervation to the stylopharyngeus muscle. The glossopharyngeal nerve sends a pharyngeal branch to the pharyngeal plexus, to which it contributes sensory fibers for the mucosa of the oropharynx (N124). The carotid sinus branch supplies general visceral afferent innervation to the carotid sinus and carotid body.
The accessory nerve (CN XI) descends laterally from the jugular foramen to pass deep to or through the deep part of the sternocleidomastoid (SCM) muscle (Fig. 3; Gr 8.9, 8.28, Table 9.13 [p. 820]; N31, 126). Emerging near the junction of the middle and upper thirds of the SCM, the accessory nerve crosses the posterior cervical triangle to pass deep to the trapezius. It supplies motor (GSE) nerve fibers to both the SCM and trapezius. During its course through the posterior triangle, the nerve may be involved by cancerous lymph nodes or injured iatrogenically during their surgical removal. The result is paralysis of the ipsilateral trapezius muscle with inability to shrug the shoulder and difficulty raising the arm above the horizontal plane.
The hypoglossal nerve (CN XII) traverses the hypoglossal canal and loops anteriorly lateral to the vagus nerve (Gr 8.9, 8.10A-B, 8.28B, Table 8.7 [pp. 766-767]; N31, 33, 71, 127). The hypoglossal nerve is bound to the vagus by fascia and often appears to be an anterior branch of it. From a posterior view the superior root of the ansa cervicalis may be seen leaving the hypoglossal nerve to descend a variable distance along the carotid artery. The hypoglossal nerve was seen in the carotid triangle ascending toward the tongue, where it innervates both the intrinsic and extrinsic muscles, except for the palatoglossus. The nerves to the thyrohyoid and geniohyoid muscles (anterior ramus of C1) also travel with the hypoglossal nerve (N128).
The cervical portion of the sympathetic trunk extends superiorly on each side from the thoracic sympathetic trunk to the base of the skull or the level of the atlas (Fig. 3; Gr 8.21, 8.24, 8.25, 8.28, Table 8.6 [p. 760]; N129, 160, 234). It is located posterior or posteromedial to the carotid sheath, embedded in prevertebral fascia. The cervical sympathetic trunk consists mainly of ascending preganglionic sympathetic nerve fibers from cell bodies in the intermediolateral cell column (lateral horn gray matter) of upper thoracic levels of the spinal cord. During embryonic development there is a ganglionic primordium associated with each of the 8 cervical spinal nerves, but these typically fuse into three cervical sympathetic ganglia in the adult. The sympathetic ganglia contain the cell bodies of postganglionic sympathetic neurons. Each cervical sympathetic ganglion sends a cardiac branch to the cardiac plexus in the thorax (i.e., there are superior, middle, and inferior cervical cardiac branches on each side) (N129, 220).
The large superior cervical sympathetic ganglion lies anterior to the atlas and axis (Fig. 3; Gr 8.24, 8.28; N129, 160). It is formed by the fusion of the upper four ganglionic primordia of the embryo and sends postganglionic sympathetic nerve fibers in gray rami communicantes to cervical spinal nerves 1-4. The superior cervical sympathetic ganglion also contains the cell bodies of all postganglionic sympathetic nerve fibers that supply structures in the head. The postganglionic sympathetic fibers to the head are distributed along blood vessels, principally in the internal carotid, external carotid, and vertebral plexuses.
The middle cervical sympathetic ganglion is the most variable of the three cervical sympathetic ganglia (Gr 8.20, 8.21, 8.28A, Table 8.6 [p. 760]; N129, 160). There may be two, or the ganglion may be absent. When present, the middle cervical ganglion typically lies in front of Cv6 at the level of the cricoid cartilage. It sends gray communicating rami to spinal nerves C5 and C6.
The inferior cervical sympathetic ganglion is fused with the first thoracic ganglion to form a cervicothoracic (stellate) ganglion in 82% of the population (Gr 8.25; N129). The cervicothoracic ganglion lies behind the vertebral artery anterior to the transverse process of Cv7. It sends gray rami communicantes to spinal nerves C7, C8, and T1. A nerve loop around the subclavian artery (ansa subclavia) also typically connects the middle and inferior cervical ganglia (Gr 8.24, Table 8.6 [p. 760]; N129).
Involvement of the cervicothoracic ganglion by a Pancoast tumor of the apex of the lung often produces Horner’s syndrome as its first sign. Therefore, an unexplained Horner’s syndrome is an indication to include Pancoast tumor in the differential diagnosis. The ganglion may be injected with anesthetic (stellate ganglion block) to temporarily relieve vasospastic disorders of the upper extremity.
3. With the head and cervical viscera pulled forward for a posterior view, clean the common carotid artery and its internal carotid and external carotid branches. Study the dilatation of the first part of the internal carotid artery to form the carotid sinus. Be aware of the functional significance of the carotid body, but don’t spend time looking for it. Look for the fragile carotid sinus nerve descending along the internal carotid artery toward the bifurcation of the common carotid artery. Note that the internal carotid artery typically doesn’t have any branches in the neck.
4. Clean the slender ascending pharyngeal artery as it branches from the medial (deep) surface of the external carotid artery near its origin. Follow the ascending pharyngeal artery superiorly lateral to the pharyngeal wall. Note that the origins of the superior thyroid artery and lingual artery also are visible from a posterior view.
5. Lateral to the carotid artery identify the large internal jugular vein. Clean the vagus nerve descending in the interval between the artery and vein. Attempt to find the small, but important, pharyngeal branch of the vagus nerve. It descends medially from the upper part of the vagus nerve toward the posterior pharyngeal wall at a level just above the greater horn of the hyoid bone, which is easily palpated. Just below the pharyngeal branch find the larger superior laryngeal nerve. Follow this branch of the vagus anteriorly and inferiorly to where it divides into the internal and external laryngeal nerves. The internal laryngeal nerve was seen piercing the thyrohyoid membrane in an earlier dissection. The external laryngeal nerve may be seen paralleling the superior thyroid artery en route to the cricothyroid muscle. Other smaller branches that may be seen arising from the vagus nerve and descending toward the thoracic cavity are the superior and inferior cervical cardiac branches.
6. Identify the recurrent laryngeal nerve ascending between the esophagus and the trachea. Note its close relationship to the inferior thyroid artery as the artery approaches the inferior pole of the lateral lobe of the thyroid gland.
7. The easiest way to find the glossopharyngeal nerve is to clean the stylopharyngeus muscle as it passes from the styloid process of the temporal bone inferomedially to the pharyngeal wall (Figs. 3, 4B). Palpate the tip of the greater horn of the hyoid bone. If you have difficulty finding it, move the head and cervical viscera back into their original position. Now locate the hyoid bone and palpate its greater horn. While keeping your finger or a forceps on the greater horn, once again pull the head and cervical viscera forward. Bluntly dissect lateral to the pharynx above the greater horn until you find the stylopharyngeus muscle entering the pharyngeal wall. Clean the glossopharyngeal nerve as it winds around the stylopharyngeus (Fig. 3). Attempt to find the pharyngeal branch of IX as it descends medially to the pharyngeal plexus.
8. The accessory nerve inclines laterally from the jugular foramen either anterior or posterior to the internal jugular vein. Find the nerve as it descends deep to or through the deep part of the sternocleidomastoid muscle. Note whether the part of the accessory nerve that traverses the posterior cervical triangle to the trapezius is still intact.
9. Clean the hypoglossal nerve as it leaves the hypoglossal canal and spirals lateral to the upper part of the vagus nerve. You may have to remove a shared fascial covering to demonstrate that the hypoglossal nerve isn’t a branch of the vagus. If you have difficulty identifying the hypoglossal nerve from behind, again restore the head and cervical viscera to their original position. Identify the hypoglossal nerve in the carotid triangle as it loops below the posterior belly and intermediate tendon of the digastric muscle. Clamp the nerve or trace it posteriorly as you reflect the head forward.
10. Posterior and slightly medial to the carotid artery clean the slender cervical sympathetic trunk, which should have been reflected with the cervical viscera. It may consist of multiple small strands connecting the cervical sympathetic ganglia. Superiorly, just below the skull base, identify the superior cervical sympathetic ganglion. Briefly try to find the pharyngeal branch of the superior cervical ganglion. It carries vasomotor fibers to the pharyngeal plexus. Look for a middle cervical ganglion at the level of the cricoid cartilage. It may be absent or there may be two ganglia. The cervicothoracic (stellate) ganglion may be difficult to see from this view, but look for it anterior to the transverse process of Cv7. The gray rami communicantes of the superior and middle ganglia will have been torn when the sympathetic trunk was reflected forward with the head and cervical viscera. XXX
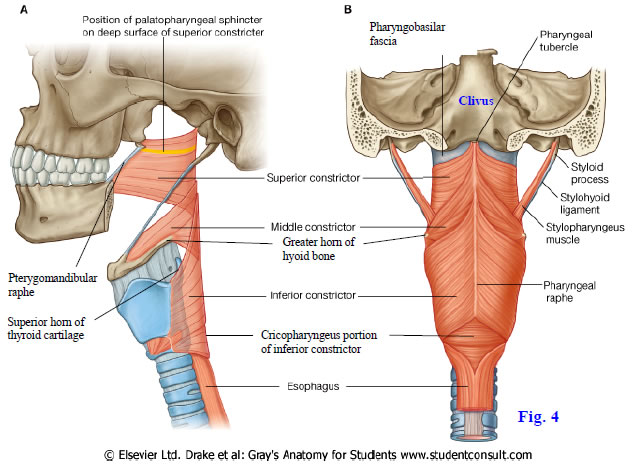
The wall of the pharynx is formed by mucous membrane, a connective tissue submucosa, a muscular layer, and an external fascial layer (Gr 8.28, 8.29; N64-68). The mucous membrane (mucosa) is continuous with that lining the nasal cavities, auditory tubes, oral cavity, larynx, and esophagus. The submucosa is well developed only superiorly, where it fills the interval between the upper border of the superior pharyngeal constrictor muscle and the base of the skull (Figs. 3, 4; Gr 8.28; N67). The submucosa is called “pharyngobasilar fascia.”
The muscular layer of the pharyngeal wall is formed by outer circularly arranged constrictor muscles and inner longitudinally oriented muscles (Gr 8.28, Table 8.7 [pp. 766-767]; N65, 67, 68). The three constrictor muscles are the superior, middle, and inferior pharyngeal constrictors. They all have anterior bony, cartilaginous, and/or ligamentous attachments and curve posteromedially to meet the corresponding muscles of the other side in a median fibrous pharyngeal raphe, which is suspended from the pharyngeal tubercle of the occipital bone (Figs. 3, 4; Gr 8.28; N67).
The superior pharyngeal constrictor attaches anteriorly to the lower part of the medial pterygoid plate, hamulus, pterygomandibular raphe, inner surface of the mandible, and side of the tongue (Fig. 4A; Gr Table 8.7 [pp. 766-767]; N65, 68). The pterygomandibular raphe is the tendinous junction between the buccinator and superior pharyngeal constrictor muscles and extends from the hamulus to the mandible near the posterior end of the mylohyoid line. The superior constrictor’s lower portion is overlapped by the middle pharyngeal constrictor muscle.
The middle pharyngeal constrictor attaches anteriorly to the greater and lesser horns of the hyoid bone and the stylohyoid ligament (N65, 68). The lower part of the middle constrictor is overlapped by the inferior pharyngeal constrictor. The inferior constrictor consists of two parts, one that attaches anteriorly to the oblique line of the thyroid cartilage and a tendinous arch between it and the cricoid cartilage and a second part that attaches to the cricoid cartilage. It is subdivided, therefore, into thyropharyngeus and cricopharyngeus portions.
The cricopharyngeus part of the inferior constrictor (Gr 8.28A, 8.35, 8.38A; N67) forms the functional upper esophageal sphincter and remains tonically contracted except during swallowing. It may prevent the regurgitation of gastric contents into the pharynx if the physiological lower esophageal (cardiac) sphincter near the gastroesophageal junction is incompetent. Unfortunately, the cricopharyngeus region also represents a site of weakness in the pharyngeal wall where pharyngeal (hypopharyngeal) diverticula may develop, sometimes between the cricopharyngeus and thyropharyngeus, potentially producing dysphagia and regurgitation with coughing, choking, and aspiration pneumonia (e.g., http://www.emedicine.com/ent/topic398.htm ).
Gaps associated with the anterior portions of the pharyngeal constrictor muscles allow structures to enter the pharyngeal wall (Fig. 4A; Gr Table 8.7 [p. 766-767]; N65, 67-71). Above the superior pharyngeal constrictor, between it and the base of the skull, the cartilaginous pharyngotympanic tube, levator veli palatini muscle, and ascending palatine branch of the facial artery enter the nasopharynx. The stylopharyngeus muscle, glossopharyngeal nerve, and stylohyoid ligament traverse the gap between the superior and middle pharyngeal constrictors. The internal laryngeal nerve and superior laryngeal artery and vein pierce the thyrohyoid membrane to enter the pharynx between the middle and inferior pharyngeal constrictor muscles. Finally, the inferior laryngeal nerve (the continuation of the recurrent laryngeal, Fig. 3; Gr 8.35, 8.38A; N80) and inferior laryngeal artery (from the inferior thyroid artery) pass deep to the lower border of the inferior pharyngeal constrictor to enter the pharynx.
The pharyngeal constrictor muscles are covered externally by buccopharyngeal fascia, which is so named because it is a continuous layer from the buccinator muscle onto the superior pharyngeal constrictor at the pterygomandibular raphe. The lower part of the buccopharyngeal fascia is the posterior continuation of the pretracheal fascia, which encloses the visceral compartment of the neck. The retropharyngeal space is located between the buccopharyngeal and prevertebral fasciae (N63).
The three pairs of longitudinal pharyngeal muscles are the stylopharyngeus, salpingopharyngeus, and palatopharyngeus (Gr 8.28A, 8.29B, 8.32, Table 8.7 [pp. 766-767]; N65, 67, 68). The only one of these muscles visible on the external surface of the pharynx is the stylopharyngeus (Fig. 3). It descends medially from the styloid process of the temporal bone to pass between the superior and middle constrictors into the bed of the palatine tonsil and blend with fibers of the palatopharyngeus muscle (Gr 8.28, 8.32E; N64, 65, 67, 68). The glossopharyngeal nerve is closely related to the stylopharyngeus during its course.
After the pharynx is opened and the mucosa removed, the palatopharyngeus muscle can be seen descending from the soft palate to the posterior border of the thyroid cartilage lamina and posterior pharyngeal wall (Gr 8.29B, 8.32C; N65, 66, 67). Its most posterior fibers interdigitate in the midline with those of the muscle of the opposite side. The salpingopharyngeus muscle arises from the cartilaginous part of the pharyngotympanic tube and descends to blend with the palatopharyngeus, of which it sometimes is considered a part.
During swallowing the longitudinal muscles elevate and dilate the pharynx to receive the bolus of food propelled there by the tongue. Serial contractions of the three constrictor muscles then carry the bolus inferiorly to the esophagus. The cricopharyngeus portion of the inferior constrictor is an exception in that it is tonically contracted and must relax for swallowing to occur normally.11. Attempt to identify the pharyngeal nerve plexus in the fascia covering the middle pharyngeal constrictor. Clean the remaining buccopharyngeal fascia from the posterior wall of the pharynx. Identify the superior, middle, and inferior pharyngeal constrictor muscles. The greater horn of the hyoid bone is a useful landmark if the constrictor muscles are difficult to distinguish. Palpate the greater horn and look for fibers of the middle pharyngeal constrictor passing posterosuperiorly from it toward the midline to overlap the lower fibers of the superior constrictor (Figs. 3, 4; N67, 68). A centimeter or so below the greater horn of the hyoid bone palpate the superior horn of the thyroid cartilage (Fig. 4A). The upper part of the inferior constrictor muscle ascends posteriorly across it from the oblique line of the thyroid cartilage, overlapping the lower fibers of the middle constrictor.
12. Review the stylopharyngeus muscle and glossopharyngeal nerve that were dissected earlier in the period. Confirm that they enter the pharyngeal wall in the interval between the superior and middle pharyngeal constrictor muscles.
13. Make a transverse incision through the posterior wall of the pharynx just below the base of the skull. Now make a vertical incision in the posterior midline of the pharynx from the middle of the first incision down to the esophagus. Spread apart the two flaps just created to examine the interior of the pharynx. Remove any debris that may be present. XXX
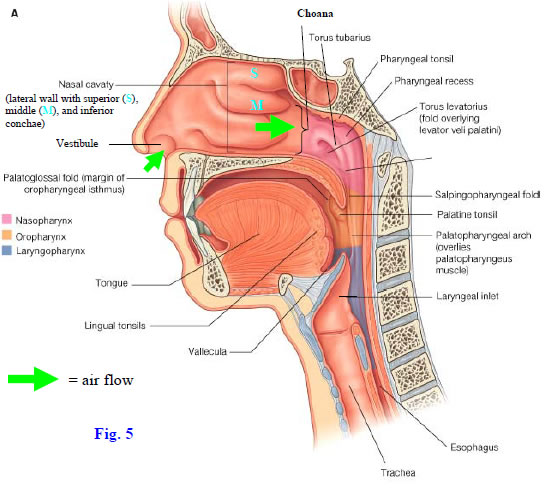
The cavity of the pharynx is subdivided into three parts—nasopharynx, oropharynx, and laryngopharynx (Fig. 5; Gr 8.29A, 8.40B, 8.41B; N63, 66). The nasopharynx is respiratory in function and is located above the soft palate (Gr 7.66, 8.32A; N66). It communicates anteriorly with the nasal cavities through the choanae, laterally with the tympanic (middle ear) cavities through the pharyngotympanic (auditory, Eustachian) tubes, and inferiorly behind the soft palate (pharyngeal isthmus) with the oropharynx. The oropharynx and laryngopharynx will be studied during the next lab.
The opening of the pharyngotympanic tube lies anterior to a mucosa-covered protrusion of its cartilage, the torus tubarius (Gr 8.29, 8.32A & C; N64-67). Extending inferiorly from the torus tubarius, behind the soft palate, is a ridge of mucous membrane overlying a slender longitudinal muscle. This is the salpingopharyngeal fold raised over the salpingopharyngeus muscle. Another ridge of mucous membrane passes medially and slightly anteriorly from the opening of the auditory tube to the upper surface of the soft palate. This is the torus levatorius overlying the levator veli palatini muscle (Fig. 5; Gr 8.29B, 8.32A & C; N66-67).
Behind the torus tubarius is a lateral extension of the pharyngeal cavity, the pharyngeal recess (Fig. 5; Gr 8.32A; N64). The roof of the nasopharynx is the location of the pharyngeal tonsil, which is usually atrophied in elderly individuals. An enlarged pharyngeal tonsil in children (adenoid or adenoids) may become inflamed (adenoiditis) and obstruct the passage of air through the nasopharynx, making mouth breathing necessary. Adenoiditis may also block the opening of the auditory tube, resulting in impaired hearing.
The auditory tube provides a direct pathway for the spread of infection from the nasopharynx to the middle ear cavity (Gr 7.84B-C; N92), producing otitis media. This is more common in children due to the shorter, more horizontally oriented pharyngotympanic tube.BISECTING THE HEAD
14. Study the portions of the naso-, oro-, and laryngopharynx that were previously exposed when the posterior wall of the pharynx was opened. The nasal cavity, nasopharynx, and oropharynx are more easily studied once the head has been bisected down to the level of the oral cavity. Start the bisection by using a sharp scalpel to cut through the soft palate and uvula in the midline. Turn to the face and make an incision through the upper lip, nostril, and external nose 3-4 mm to the left of the midline. Using a hacksaw, saw through the cranial base and upper face, including the hard palate, in line with the scalpel incisions of the face. The head superior to the oral cavity should now spread apart like a book opening in the middle. If it doesn’t, make sure that the saw cuts extended all the way through the hard palate and maxillary alveolar arch anteriorly and all the way to the foramen magnum posteriorly. Do not bisect the tongue or the mandible at this time. The internal features of the pharynx will be studied after the nasal cavity. XXX
The nose is formed by the external nose and the nasal cavities. The external nose has cartilaginous and bony parts (Fig. 6; Gr 7.62A-D; N35). The cartilaginous portion consists of two greater alar cartilages, two lateral nasal cartilages, and a septal cartilage. The U-shaped greater alar cartilages are flexible to allow dilation and constriction of the nares. They are located inferior to the lateral nasal cartilages. The lateral nasal cartilages (lateral processes of nasoseptal cartilage) are part of a stiff piece of cartilage that is completed by the midline septal cartilage. The lateral nasal cartilages and septal cartilage are continuous with each other at the dorsum of the nose (Fig. 6, inset).
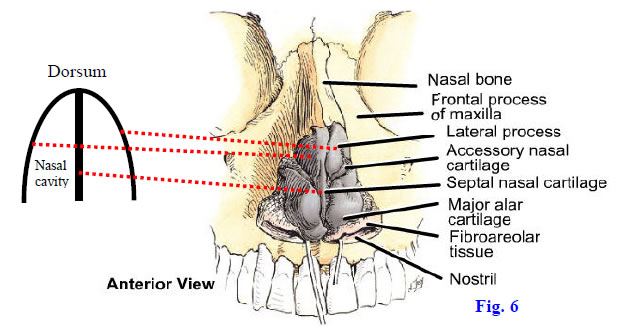
The bony part of the external nose is formed by the two nasal bones, the two maxillae, and bony elements of the nasal septum (Gr 7.1B, 7.62E-F; N4, 35). The nasal bones and maxillae define the circumference of the piriform aperture in the prepared skull. The nasal septum divides the chamber of the nose into right and left nasal cavities (Fig. 7; N48), which frequently are of unequal size due to deviation of the septum to one side.
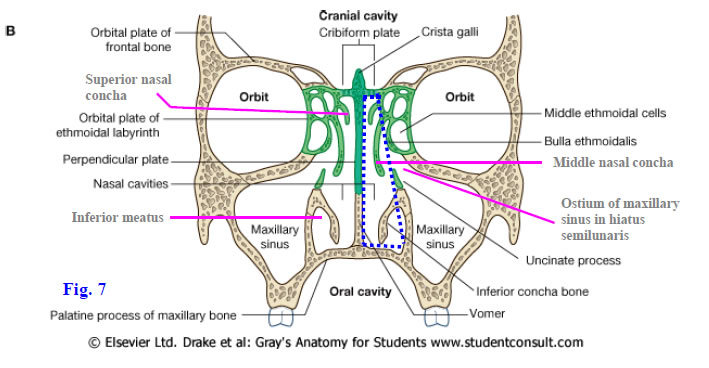
Each triangular nasal cavity (Fig. 7; Gr 7.74, 7.76; N36) has an anterior naris (nostril) that opens into an antechamber, the vestibule (Figs. 5, 6; Gr 7.66; N36), containing coarse hairs (vibrissae) to filter air. The nasal cavity opens posteriorly into the nasopharynx through a choana (Fig. 5; Gr 7.66, 8.29A; N36, 66). The nasal cavity has a roof, floor, medial wall, and lateral wall. The narrow roof is formed in part by the cribriform plate of the ethmoid bone, which separates the nasal cavity from the anterior cranial fossa (cranial cavity) (N36, 48). This intimate relationship is why a fracture of the anterior cranial base may be indicated by the leakage of clear cerebrospinal fluid from the nose (CSF rhinorrhea). The floor of the nasal cavity is wider than the roof and is formed mainly by the palatine processes of the maxillae and the horizontal plates of the palatine bones, which separate the nasal cavity from the oral cavity.
The medial wall of the nasal cavity is the nasal septum. Its bony portion is formed posterosuperiorly by the perpendicular plate of the ethmoid bone and posteroinferiorly by the vomer (Fig. 7; Gr 7.62F, 7.63B; N38). The septum is completed anteriorly by the nasal septal cartilage, which fits into the angle between the two bones.
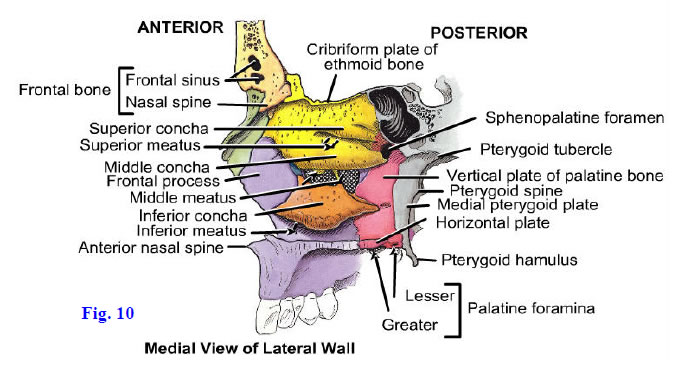
The lateral wall of the nasal cavity has a more complicated structure than the medial wall due to the presence of three curved plates of bone—the superior, middle, and inferior conchae or turbinate bones (Figs. 7, 10; Gr 7.63A, 7.66, 7.76; N36, 37, 48). Each concha overhangs a narrow air passage or recess, a meatus. The superior conchae and the larger middle nasal conchae are medial projections of the ethmoid bone. The inferior conchae are independent bones and are the largest of the conchae. Occasionally a small supreme concha is present above the superior concha.
The nasal cavity is lined by mucous membrane covering the periosteum of bone (mucoperiosteum) and the perichondrium of cartilage (mucoperichondrium). The mucosa on the upper parts of the septum and lateral nasal wall contains receptor cells for the sense of smell (olfaction) (Gr 7.64, Table 9.2 [p. 800]; N41, 42). Nerve cell processes from neurons in this olfactory mucosa traverse the cribriform plate of the ethmoid bone to synapse in the olfactory bulb (N118). The remainder of the nasal cavity is lined by a ciliated respiratory mucosa involved in warming and humidifying inspired air and in trapping particulate debris that escapes the vibrissae. The presence of conchae greatly increases the surface area, and the mucosa over them contains a venous plexus resembling erectile tissue that may become engorged and obstruct air flow. The right and left nasal cavities are alternately obstructed in some (≈20-30%) normal individuals during a nasal cycle ( http://www.utmb.edu/otoref/Grnds/Turbinate-2003-0312/Turbinate-2003-0312.htm ).
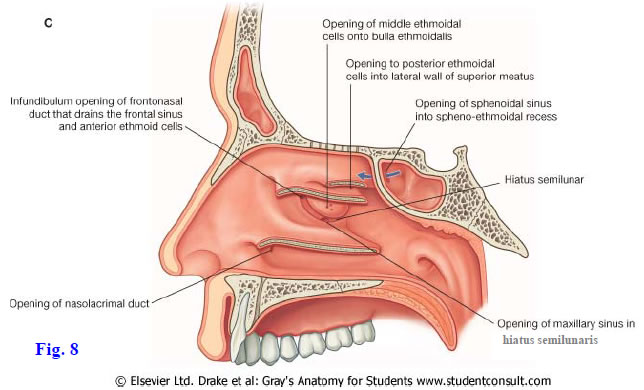
The bones of the skull adjoining the nasal cavities are hollow. The spaces that the bones contain, the paranasal air sinuses (Gr 7.69, 7.71, 7.72C, 7.74; N47-50), develop as evaginations of the nasal mucosa and retain their openings (ostia) into the nasal cavity on the lateral walls. The paranasal sinuses are lined by respiratory mucosa. Their exact functions are controversial, but they add resonance to the voice, may help moderate the temperature of the head, and reduce the weight of the skull. The sphenoidal sinus opens into the sphenoethmoidal recess, which is a shallow groove located above and behind the superior concha (Fig. 8; Gr 7.67A; N36). Posterior ethmoidal air cells open into the superior meatus, which is the air passage beneath the superior concha.
The middle meatus has a complicated structure and receives the openings of multiple paranasal sinuses. It features a rounded elevation, the bulla ethmoidalis (ethmoidal bulla), located above a semicircular groove, the hiatus semilunaris (semilunar hiatus) (Figs. 7, 8; Gr 7.67, 7.68; N36, 37). The bulla ethmoidalis is formed over the middle ethmoidal air cells, which open near its middle. The frontonasal duct from the frontal sinus has a funnel-shaped opening, the infundibulum, into the anterior part of the hiatus semilunaris or just in front of it. The anterior ethmoidal air cells and maxillary sinus also drain into the hiatus semilunaris.
The frontal sinus drains into the middle meatus of its side. The paired sinuses vary considerably in size from one person to another and even on the right and left sides of the same individual. Typically the frontal sinuses extend both vertically upward into the squamous part of the frontal bone and horizontally backward into the orbital parts. The close relationship of the frontal sinuses to the contents of the anterior cranial fossa and the orbits means that an infection in frontal sinusitis may result in life-threatening complications, such as frontal lobe abscess, meningitis, and/or orbital cellulitis (see http://emedicine.medscape.com/article/862292-overview and http://www.ghorayeb.com/FrontalEpiduralAbscess.html ).
The ostium of the maxillary sinus opens into the hiatus semilunaris well above the floor of the sinus (Fig. 7; Gr 7.67A, 7.68A, 7.69B, 7.76A; N36, 37, 48, 49). Inflammation of the maxillary sinus (maxillary sinusitis) resulting from an infection or allergy results in swelling of the sinus mucosa that may obstruct drainage through the poorly placed ostium. In chronic sinusitis, the uncinate process of the ethmoid bone (inferior boundary of the hiatus semilunaris) (Fig. 7) may be surgically removed to allow drainage from the inflamed sinus. Alternatively, an artificial ostium may be created through the lateral wall of the inferior meatus to allow drainage.
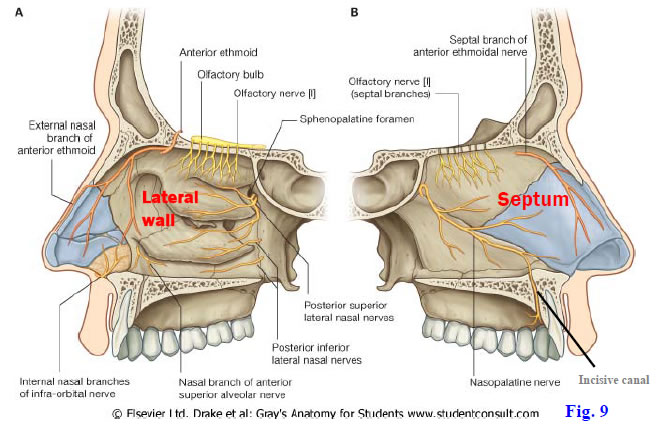
Nerves that supply the mucosa of each nasal cavity include the olfactory nerves, anterior and posterior ethmoidal nerves (V1), and the nasopalatine and posterior lateral nasal branches of the maxillary nerves (V2) (Fig. 9; Gr 7.64; N41, 42). The olfactory nerves ( CN I) are actually the central processes of bipolar special visceral afferent (SVA) olfactory neurons and traverse the cribriform plate to synapse in the olfactory bulb (Gr Table 9.2 [p. 800]; N118). The olfactory neuron cell bodies are located in olfactory mucosa covering the upper part of the lateral nasal and septal walls. They are unusual among neurons in that they are replaced monthly throughout life.
The anterior ethmoidal nerve arises from the nasociliary branch of the ophthalmic division of the trigeminal (V1) (Gr 7.38; N86). It leaves the orbit by the anterior ethmoidal foramen to traverse the ethmoidal air cells. The anterior ethmoidal nerve enters the anterior cranial fossa and crosses the superior surface of the cribriform plate before descending into the nasal cavity through a tiny slit (Fig. 9). The anterior ethmoidal nerve supplies the upper anterior portions of the nasal septum and lateral nasal wall. Its external branch leaves the nasal cavity between the nasal bone and lateral nasal cartilage to become the cutaneous external nasal nerve (Fig. 9A).
The posterior portion of the nasal mucosa is supplied by the nasopalatine nerve on the septum and by posterior superior and posterior inferior lateral nasal branches on the lateral nasal wall (Fig. 9; Gr 7.64; N41, 42). The nasopalatine nerve descends anteriorly on the septum to the incisive canal, which it traverses to supply the palate behind the maxillary incisor teeth (i.e., the primary palate). The posterior superior lateral nasal nerves pass through the sphenopalatine foramen to reach the nasal mucosa. The posterior inferior lateral nasal nerves branch from the greater palatine nerve and pass through small, unnamed foramina in the perpendicular plate of the ethmoid bone to enter the nasal cavity.
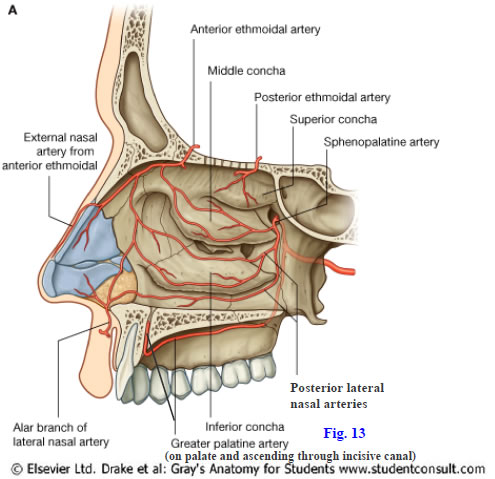
The blood supply to the nasal cavity arises from both the internal and external carotid arteries (Gr 7.65; N39, 40). The anterior and posterior ethmoidal arteries are branches of the ophthalmic artery (from the internal carotid) and parallel the corresponding nerves through the ethmoidal air cells and anterior cranial fossa to reach the nasal cavity (Gr 7.38, Table 7.6 [p. 647]; N85). Whereas the posterior ethmoidal nerve often doesn’t reach the nasal cavity, the posterior ethmoidal artery does.
The sphenopalatine artery is the largest artery supplying the nasal cavity. It is a terminal branch of the maxillary artery (from the external carotid) in the pterygopalatine fossa and enters the nasal cavity via the sphenopalatine foramen (Gr 7.65A, 7.69C; N39, 40). It gives posterior lateral nasal and posterior septal branches. One of the posterior septal branches accompanies the nasopalatine nerve toward the incisive canal, but does not traverse the canal to reach the palate.
The terminal portion of the greater palatine artery ascends from the hard palate through the incisive canal to reach the anterior part of the nasal septum. The septal branch of the superior labial artery (from the facial artery) passes onto the anterior septum from the upper lip. Therefore, the anterior inferior portion of the nasal septum is the site of anastomoses of the anterior and posterior ethmoidal, sphenopalatine, greater palatine, and septal branch of the superior labial arteries (Gr 7.65B). This Kiesselbach’s area is the most frequent site of nose bleeds (epistaxis). Epistaxis and its treatment may have serious complications (e.g., see http://www.emedicine.com/emerg/topic806.htm ). A posterior origin of epistaxis involves branches of the sphenopalatine artery and may require operative management or arterial embolization.15. On a skull study the piriform aperture. Note that the piriform aperture is bounded superiorly by the two nasal bones and laterally and inferiorly by the maxillae. If the bones are still intact, the contributions of the perpendicular plate of the ethmoid and the vomer to the nasal septum should be apparent.
16. Now turn to the bisected head of the cadaver. If the saw cut was made as directed, the nasal septum should be partially or fully intact on one side of the head. Is the septum deviated to one side? If it is deviated, was the deviation enough to obstruct the flow of air through that nasal cavity? Bluntly dissect through the mucous membrane covering the septum and attempt to identify the nasopalatine nerve and the accompanying septal branch of the sphenopalatine artery. They typically descend anteriorly along the junction of the vomer and septal cartilage. Look for the anterior ethmoidal nerve and artery coursing along the anterosuperior part of the septum. Posteriorly and superiorly on the septum look for the thin olfactory nerves ascending into the cribriform plate of the ethmoid bone.
17. Identify the portions of the nasal septum formed by the perpendicular plate of the ethmoid bone, the vomer, and the septal cartilage. Depending on instructions from the course faculty, the nasal septum may be preserved for future study or removed so that both lateral nasal walls are exposed.
18. On the lateral wall of the nasal cavity identify the superior, middle, and inferior nasal conchae. Look to see if there is a supreme nasal concha in this cadaver. Above the highest concha—whether superior or supreme—find the shallow sphenoethmoidal recess and look for the opening of the sphenoidal sinus into it. Carefully remove the superior concha and look for the opening of the posterior ethmoidal air cells in the superior meatus.
19. Remove the middle nasal concha to expose the complicated middle nasal meatus. Identify the bulge of the bulla ethmoidalis (ethmoidal bulla) and look for the opening of the middle ethmoidal air cells on its surface. Below the bulla ethmoidalis find the curved hiatus semilunaris (semilunar hiatus). Identify the funnel-shaped infundibulum, where the frontonasal duct drains into the middle meatus. Is this opening in the anterosuperior part of the hiatus semilunaris or anterior to it in this nasal cavity? Locate the ostium of the anterior ethmoidal air cells in the upper part of the hiatus semilunaris. The ostium of the maxillary sinus opens into the posterior part of the hiatus. Push a probe through the orifice into the large maxillary sinus.
20. Cut away the inferior nasal concha. Identify the opening of the nasolacrimal duct in the anterior portion of the inferior nasal meatus. In ONE NASAL CAVITY carefully remove the medial wall of the maxillary sinus. Enlarge the opening to expose the entire sinus. In the roof of the maxillary sinus, which separates it from the orbit, look for the ridge that is usually formed by the infraorbital canal. Carefully remove the mucoperiosteum and bone of the ridge to open the canal and expose the infraorbital nerve and vessels. Clean the infraorbital nerve and artery and find the anterior superior alveolar nerve and artery, respectively, branching from them to descend in the anterior wall of the maxillary sinus. They supply the anterior maxillary teeth. Be aware of, but don’t attempt to clean, the middle superior alveolar nerve and artery. XXX
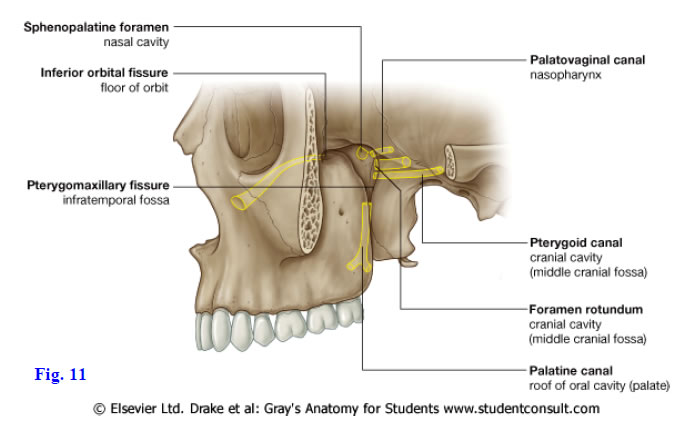
The nerves and blood vessels in the posterior part of the nasal cavity enter it from the pterygopalatine fossa. This small pyramidal space is located lateral to the wall of the nasal cavity, between it and the infratemporal fossa. The medial wall of the pterygopalatine fossa is formed by the perpendicular (vertical) plate of the palatine bone (Fig. 10; Gr 7.63A, 7.69A & C; N8, 37). The fossa is bordered posteriorly by the pterygoid process of the sphenoid bone and anteriorly by the maxilla.
The pterygopalatine fossa has communications with several other spaces in the head. It communicates medially with the nasal cavity through the sphenopalatine foramen (Figs. 10, 11; N8, 37) and laterally with the infratemporal fossa through the pterygomaxillary fissure (Fig. 11; N6, 16). Anterosuperiorly it communicates with the orbit through the inferior orbital fissure and posterosuperiorly with the middle cranial fossa through the foramen rotundum. The greater palatine canal extends inferiorly from the pterygopalatine fossa to the oral cavity. Posteriorly, the pterygoid canal connects the pterygopalatine fossa with the anterior margin of the foramen lacerum, which is closed by cartilage in life; therefore, the pterygoid canal is usually listed as connecting the pterygopalatine fossa with the middle cranial fossa. The palatovaginal canal (formerly the pharyngeal canal) runs from the pterygopalatine fossa into the roof of the nasopharynx.
The contents of the pterygopalatine fossa include the pterygopalatine ganglion, maxillary nerve (V2), and branches of the pterygopalatine (third) part of the maxillary artery. The pterygopalatine ganglion is suspended from the maxillary nerve by two ganglionic (pterygopalatine) branches (Gr 7.70, 7.72B; N41-44). The pterygopalatine ganglion is one of four pairs of parasympathetic ganglia in the head (N130-133) and contains the cell bodies of postganglionic parasympathetic neurons. The preganglionic parasympathetic fibers that synapse in the ganglion reach it via the nerve of the pterygoid canal, which is formed by the union of the greater petrosal nerve and the deep petrosal nerve (Gr 7.70B, Table 9.9 [p. 813]; N43, 132). The greater petrosal nerve carries preganglionic parasympathetic nerve fibers from the facial nerve (VII). The deep petrosal nerve carries postganglionic sympathetic fibers from the internal carotid plexus that traverse the ganglion without synapsing. The cell bodies of the postganglionic sympathetic neurons are located in the superior cervical sympathetic ganglion.
General sensory (GSA) fibers from the maxillary nerve also traverse the pterygopalatine ganglion without synapsing. The nerves that leave the pterygopalatine ganglion are sometimes described as “branches of the ganglion” even though they consist largely of sensory fibers from the maxillary nerve and are better considered as its branches. Branches include the greater and lesser palatine, nasal, and pharyngeal nerves.
The greater palatine nerve descends through the greater palatine canal with the greater palatine artery (Figs. 11, 12; Gr 7.57C-D, 7.64, 7.69C; N41, 42, 52). It emerges onto the oral surface of the palate at the greater palatine foramen and passes forward medial to the maxillary alveolar process. The greater palatine nerve supplies the mucoperiosteum of the palate and the adjacent gingiva as far forward as the incisive fossa. Posterior inferior lateral nasal branches leave the greater palatine nerve in the greater palatine canal and enter the nasal cavity through small canals in the perpendicular plate of the ethmoid bone to supply respiratory mucosa (Fig. 9; N41).
The lesser palatine nerves descend through the greater palatine canal for a short distance with the greater palatine nerve before diverging posteriorly in the lesser palatine canal (Figs. 11, 12). They enter the oral cavity at lesser palatine foramina and pass posteriorly onto the soft palate and upper part of the palatine tonsil (N41, 42, 52). A few taste (SVA) fibers with cell bodies in the geniculate ganglion of VII may be carried in the greater petrosal nerve and distributed with the other components of the lesser palatine nerve, but we will ignore them.
The posterior superior lateral nasal nerves enter the posterior part of the nasal cavity through the sphenopalatine foramen (Fig. 9; Gr 7.64, 7.69C; N41, 42). They supply the respiratory mucosa of the upper posterior part of the lateral nasal wall. The nasopalatine nerve also enters the nasal cavity through the sphenopalatine foramen. It crosses the roof of the nasal cavity to reach the septum and descends anteriorly along it toward the incisive canal. The nasopalatine nerve supplies the septum and descends through the incisive canal to supply the oral surface of the anterior palate, behind the maxillary incisors.
The pharyngeal nerve runs posteromedially from the pterygopalatine ganglion in the palatovaginal (formerly pharyngeal) canal (Figs. 11, 12; Gr 7.64A, 7.72B; N42, 132). The pharyngeal nerve probably helps supply the sphenoidal sinus before ending in the mucosa of the nasopharynx, which it also supplies (N42, 62 [lower right]).
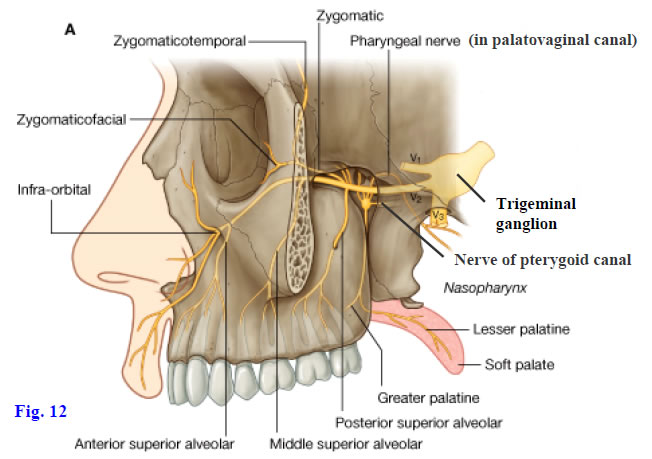
The maxillary division of the trigeminal nerve (V2) enters the pterygopalatine fossa from the middle cranial fossa through the foramen rotundum (Fig. 12; Gr 7.47B, 7.70A, 7.72B, Table 9.7 [pp. 808-809]; N43, 44,130). It is a sensory nerve consisting of general somatic afferent (GSA) fibers; however, some of its branches also distribute postganglionic general visceral efferent (GVE) fibers from other sources. Branches of the maxillary nerve include the zygomatic nerve, ganglionic branches, posterior superior alveolar nerve, and infraorbital nerve (Fig. 12).
The zygomatic nerve enters the orbit through the inferior orbital fissure and divides into cutaneous zygomaticotemporal and zygomaticofacial branches (Fig. 12; Gr 7.70, 7.72B; N44). In addition to GSA fibers, the zygomaticotemporal branch carries postganglionic parasympathetic secretomotor fibers from cell bodies in the pterygopalatine ganglion that join the lacrimal nerve (V1) via a communicating branch. These parasympathetic fibers supply the lacrimal gland. Accompanying postganglionic sympathetic fibers traverse the pterygopalatine ganglion without synapsing and are vasomotor to the lacrimal gland (N132).
The infraorbital nerve is the continuation of the maxillary nerve (Figs. 11, 12; Gr 7.39A, 7.60A, 7.70A, 7.72B; N44, 71) and changes names as it enters the orbit through the inferior orbital fissure. It traverses the infraorbital groove and canal in the floor of the orbit and emerges onto the face at the infraorbital foramen. The infraorbital nerve gives off the anterior superior alveolar nerve to the maxillary canine and incisor teeth and their gingiva just before reaching the infraorbital foramen. More proximally it usually gives off a middle superior alveolar nerve near the entrance of the infraorbital canal. The middle superior alveolar nerve supplies the maxillary premolar teeth and gingiva. Anesthetic sometimes is injected into the infraorbital foramen before dental work on the anterior maxillary teeth. If the needle passes too far into the infraorbital canal, the inferior branch of the oculomotor nerve in the orbit may be blocked, producing double vision (diplopia).
The posterior superior alveolar nerve was seen during the infratemporal fossa dissection (Gr 7.47, 7.49A, 7.70; N44, 45, 71). It branches from the maxillary nerve in the pterygopalatine fossa and passes laterally through the pterygomaxillary fissure to reach the posterior superior alveolar foramen in the infratemporal surface of the maxilla. The posterior superior alveolar nerve supplies the three maxillary molar teeth and their gingiva.
The maxillary artery is one of the terminal branches of the external carotid artery. It was seen coursing medially through the infratemporal fossa (Gr 7.47, 7.48; N39, 69). The pterygopalatine (third) part of the maxillary artery enters the pterygopalatine fossa via the pterygomaxillary fissure. It gives rise to branches that accompany the nerves of the fossa. These include the posterior superior alveolar and infraorbital arteries, which may have been seen during the infratemporal fossa dissection. The posterior superior alveolar artery branches near the pterygomaxillary fissure and accompanies the nerve to foramina on the infratemporal surface of the maxilla.
The infraorbital artery enters the orbit from the pterygopalatine fossa through the inferior orbital fissure (Gr 7.39A, 7.47, 7.48A; N39, 69). It accompanies the infraorbital nerve in the infraorbital groove and infraorbital canal and has similar anterior superior alveolar and middle superior alveolar branches. In a blowout fracture of the orbital floor, the infraorbital artery may be a source of bleeding.
The greater palatine artery descends through the greater palatine canal with the greater palatine nerve (Fig. 13; Gr 7.57C-D, 7.65B, 7.69C; N39, 40, 52). It supplies the hard palate and ascends through the incisive canal to reach the Kiesselbach’s area of the anterior nasal septum, where it may contribute to epistaxis. The lesser palatine artery branches from the greater palatine and descends with the lesser palatine nerve to supply the soft palate and upper part of the palatine tonsil. (Note: some authors term the branch arising from the maxillary artery the “descending palatine artery,” which then divides into greater and lesser palatine arteries.)
The sphenopalatine artery is the continuation of the maxillary artery. It enters the nasal cavity through the sphenopalatine foramen and divides into posterior lateral nasal (Fig. 13; Gr 7.65; N39, 40) and posterior septal branches. Branches of the sphenopalatine artery are the source of epistaxis from the posterior nasal cavity, which is less frequent than anterior epistaxis.
The small artery of the pterygoid canal and the pharyngeal artery accompany the nerves of the same name.
21. Expose the contents of the pterygopalatine fossa by carefully chipping away the bone of the perpendicular plate of the palatine bone (N36-37). First strip away the mucoperiosteum just posterior to the removed nasal conchae and nasal meatus (i.e., just posterior to the exposed maxillary sinus). The greater palatine nerve and artery may be visible through the thin bone. If the artery and nerve aren’t apparent, the location of the pterygopalatine fossa and greater palatine canal can be determined by first finding the greater palatine foramen medial to the third maxillary molar tooth (Figs. 10, 13). The tooth is often missing, but the foramen can be found by lifting the mucoperiosteum from the posterior portion of the hard palate and locating the greater palatine nerve and artery as they pass anteriorly from the foramen. Carefully remove bone from the perpendicular plate of the ethmoid to follow the contents of the greater palatine canal superiorly to the level of the sphenoidal sinus. Locate the sphenopalatine foramen just below the floor of the sinus (Figs. 10, 13).
22. Identify the small pterygopalatine ganglion immediately lateral to the sphenopalatine foramen. The greater and lesser palatine nerves both descend from the ganglion. Look for two small nerves that pass posteriorly from the ganglion. The more lateral nerve, which often raises a ridge in the floor of the sphenoidal sinus, is the nerve of the pterygoid canal. Confirm that it passes posterolaterally toward the foramen lacerum by carefully chipping away bone of the ridge to expose the nerve. The nerve passing posteromedially from the pterygopalatine ganglion is the pharyngeal nerve. It frequently is lost on one side during bisection of the head. Attempt to find the ganglionic branches that suspend the pterygopalatine ganglion from the maxillary nerve. These may be difficult to demonstrate.
23. Clean the greater palatine artery descending just anterior to the nerve of the same name. Find where the small lesser palatine artery diverges posteriorly from the greater palatine artery. The lumen of the sphenopalatine artery may be apparent where the artery was cut entering the nasal cavity through the sphenopalatine foramen. Slightly more laterally attempt to find the artery of the pterygoid canal accompanying the nerve. XXX
The illustrations in this dissection guide are used with permission from Gray’s Anatomy for Students. 2005, by Richard Drake, Wayne Vogel, and Adam Mitchell, Elsevier Inc., Philadelphia; and from Grant’s Atlas of Anatomy, 11E, 2005, Anne Agur and Arthur Dalley II, Lippincott Williams & Wilkins, Philadelphia.